Chapter
8
Using Calendar
This chapter
describes how to use Netscape Calendar to schedule meetings, manage your
calendar, and track tasks.
Note Calendar
is only available with Communicator Professional Edition.
Signing in
-
From the Communicator menu,
choose Calendar.
-
Type your user name.
-
Type your password. If
you are unsure of your password, contact your system administrator.
-
Choose a server from the list
or type the name of the server you want to connect to. If
you are not sure which server to choose, ask your system administrator.
If
you prefer, you can choose to work offline. See "Working
offline" for more information.
-
Click OK.
-
If this is the first time you
are using Calendar, you might want to follow the steps under
"Setting your preferences" to customize Calendar for your use.
Viewing your agenda
Your agenda
displays the entries in your calendar.
-
From the File menu, choose Open
Agenda, then choose An Agenda.
-
Click Modify your own agenda.
-
Click OK.

Viewing your agenda in daily, weekly, or monthly
format
-
From the View menu, choose Day,
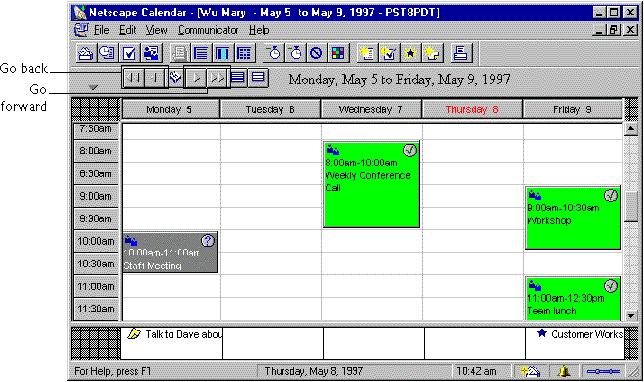
Week, or Month. Your daily agenda lets you view
and modify entries one day at a time. Your weekly and monthly agendas let
you view and modify entries for a specific week or month.
Tip To
move forward or backward in your agenda, click the arrow or calendar buttons
above the agenda. For more information about the buttons, see Calendar's
online help.
Scheduling a meeting
You can
schedule meetings on a one-time or recurring basis. If you have set your
agenda notification preferences to notify attendees whenever you schedule
a meeting, Calendar gives you the option of sending a notification email
message to each attendee. See "Setting agenda notification
preferences" for more information.
Tip To
help you determine the best meeting time, you might want to view the combined
agendas for a conference room and prospective attendees before you try
to schedule the meeting. See "Viewing a combined agenda"
for more information.
-
Open your agenda. See
"Viewing your agenda" if you don't know how to open your agenda.
-
From the File menu, choose New,
and then choose Agenda Entry.
-
Type a title for the proposed
meeting.
-
Choose the date and time settings
you want.
-
Type the name of a person, or
click
 to search for a person.
-
To include a group, click
 .
.
-
To include a conference room
or other resource (such as a piece of equipment), type re: followed by
the first few letters of the resource's name. If
you don't know the resource's name, click
 , and then click Resources to search for it.
-
To schedule this meeting on
a recurring basis, click Repeating, choose the options you want, and click
OK.
-
Click "Check conflicts" to see
if your proposed meeting time conflicts with other entries in your agenda
or in a prospective attendee's agenda. Calendar
indicates conflicts by placing an "X" next to the proposed meeting. If
Calendar finds no conflicts, a checkmark appears instead.
Tip If
Calendar finds conflicts, double-click the proposed meeting to see more
information about the conflict.
-
Click Create to propose the
meeting.
Rescheduling or changing a meeting
You can
reschedule a meeting, add or remove attendees, or change the meeting's
location. If you have set your agenda notification preferences to notify
attendees whenever you reschedule a meeting, Calendar gives you the option
of sending a notification email message to each attendee. See
"Setting agenda notification preferences" for more information.
Note You
can only reschedule a meeting that you created.
-
Open your agenda. See
"Viewing your agenda" if you don't know how to open your agenda.
-
In your agenda window, double-click
the meeting that you want to change.
-
Click General, and make the
necessary changes.
-
Click OK.
Canceling a meeting
If you
have set your agenda notification preferences to notify attendees whenever
you cancel a meeting, Calendar gives you the option of sending a notification
email message to each attendee. See "Setting agenda
notification preferences" for more information.
Note You
can only cancel a meeting that you scheduled.
-
Open your agenda. See
"Viewing your agenda" if you don't know how to open your agenda.
-
In your agenda window, click
the meeting that you want to cancel.
-
(Windows) From the Edit menu,
choose Delete Entry. (Macintosh) From the Edit
menu, choose Clear Event.
Responding to a proposed meeting
-
From your In-Tray or agenda
window, double-click the meeting that you want to respond to. See
"Viewing your agenda" or "Displaying your In-Tray"
if you don't know how to open your agenda or In-Tray.
-
Click Reply.
-
Choose a reply option.
-
Click OK.
Adding an event to your agenda
An day
event is an agenda entry that lasts one or more days and that can include
other people or groups. For example, if you and some others will be attending
a conference, you can add the conference as an event. The event appears
in your agenda window and in each recipient's In-Tray.

Follow
these steps to create an event in your agenda:
-
Open your agenda. See
"Viewing your agenda" if you don't know how to open your agenda.
-
From the File menu, choose New,
and then choose Day Event.
-
Enter the requested information
in the dialog box.
-
(Windows only) If necessary,
click OK.
-
Click Create.
For more
information about working with events, see Calendar's online help.
Adding an event from a web page to your agenda
An increasing
number of web sites contain vCalendar objects. A vCalendar object
contains information about an upcoming event listed on a web page. If an
event has a vCalendar object associated with it, you can automatically
add the event to your agenda.
(Windows)
To use vCalendar objects, you must have the Netscape vCalendar plug-in
installed in your Netscape/Communicator/Programs/Plugins directory.
Follow
these steps to use a Calendar object to add an event to your agenda:
-
Using Navigator, go to a web
site that lists events along with vCalendar objects. For
example, the web site at http://conference.calendar.com lists information
about upcoming conferences, seminars, and workshops around the world. Each
event has an associated vCalendar object.
-
When you find an event that
you want to add to your agenda, click the vCalendar object button associated
with the event. If Calendar is not running,
Communicator displays a message so you can start it.
-
When Calendar displays a dialog
box that lists information about the event, click Add Entry to add the
event to your agenda.
Creating a daily note
A note
is an informal message that you create for a specific day. You can create
the note just for yourself or for other people or groups. The note appears
in your agenda window and in each recipient's In-Tray.
-
Open your agenda. See
"Viewing your agenda" if you don't know how to open your agenda.
-
From the File menu, choose New,
and then choose Daily Note.
-
Type the text for the note in
the Title box.
-
Choose the options you want.
-
(Windows) To have the note appear
in the In-Tray of one or more recipients, click the People/Resources tab
and add each recipient. (Macintosh) To have
the note appear in the In-Tray of one or more recipients, type a recipient's
name in the "Add" entry box and click the checkmark to confirm your entry.
-
(Windows only) Click OK.
-
Click Create.
Viewing another person's agenda
You can
view another person's agenda to see what meetings they're scheduled to
attend on a given day, or to check their availability for a meeting.
Note If
you don't want others to be able to view your agenda, you can keep your
agenda private using the Access Rights command on the Edit menu.
-
From the File menu, choose Open
Agenda, then choose An Agenda.
-
Click "View the agenda of."
-
Enter the name of the person
whose agenda you want to view. If you are unsure
how to spell the name, enter the first few letters of the person's name
and click
 to search for the
name.
-
Click the Checkmark button
 to confirm your entry.
-
Click OK.
Viewing a conference room's agenda
You can
view a conference room's agenda if you want to schedule a meeting in that
conference room, and you want to make sure it's available.
-
From the File menu, choose Open
Agenda, then choose An Agenda.
-
Click "View the Agenda of."
-
Click the Search button
 .
.
-
Click Resources. Typically,
resources consist of conference rooms or other items such as pieces of
equipment.
-
Type the conference room's name
and click Search.
Tip Instead
of typing the entire name, you can type re: followed by the first few letters
of the name. For example, instead of typing "Northeast Conference Room,"
you can type "re:Nor". If there's more than one matching entry, Calendar
lets you choose the entry you want.
If you
don't know or aren't sure of the conference room's name, click Search to
display a list of conference rooms. Select a conference room from the list.
-
Click OK to close the Directory
Search dialog box.
-
Click OK to close the Open an
Agenda dialog box. Calendar displays the conference
room's agenda.
-
Use the navigation buttons above
the agenda to view the conference room's agenda on a different date.
Viewing a combined agenda
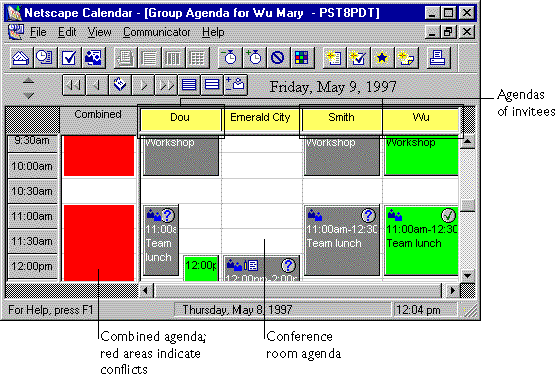
You can
view the combined agendas of people and a conference room (or other resource)
to avoid conflicts when scheduling a meeting in a particular room.

Follow
these steps to create a combined agenda:
-
From the File menu, choose Open
Agenda, then choose A Group Agenda.
-
Click the Search button
 .
.
-
In the Directory Search dialog
box, click Resources.
-
Click Search to display a list
of conference rooms.
-
Select a conference room.
-
Click Add.
-
Click People.
-
Type the name of the person
whose agenda you want to view, and click Search.
-
Select the person's name.
-
Click Add.
-
To add another person's agenda,
repeat steps 8 through 10.
-
Click OK to close the Directory
Search dialog box.
-
Click OK to close the Selection
for Group Agenda dialog box. Calendar displays
the combined agenda for the selected people and conference room. Red areas
indicate conflicts.
-
Use the navigation buttons above
the agenda to view a different date for the combined agenda.
Creating a group
For scheduling
convenience and to save time, you can create a group that consists of a
list of people with whom you meet regularly. You can also include resources
(typically, conference rooms or other items such as pieces of equipment)
as part of the group.
-
From the Edit menu, choose Manage
Groups.
-
Type the name of the group in
the "Add group" entry box.
-
Click the checkmark button
 to confirm your entry.
-
In the "Add member" entry box,
type the name of a person you want to add to the group. To
search for a person's name, click the Search button
 .
.
-
Click the checkmark button
 to confirm your entry.
-
Continue adding people to the
group.
-
(Windows) Click OK when you
are done. (Macintosh) Click Done.
Tip To
schedule a group meeting, first open the group's combined agenda. To open
the group's combined agenda, from the File menu, choose Open Agenda, then
choose A Group Agenda. To schedule a meeting for the group, from the File
menu, choose New, then choose Agenda Entry.
Editing a group
You can
add or remove group members or rename the group.
-
From the Edit menu, choose Manage
Groups.
-
Select the name of the group
that you want to edit.
-
To delete a member, select the
member and click Delete Member.
-
To add a member, type a name
in the "Add Member" entry box and click the Checkmark button
 .
.
-
To change the group's name,
edit the name in the "Modify selected group" entry box, and click the Checkmark
button
 .
.
-
(Windows) Click OK. (Macintosh)
Click Done.
Deleting a group
-
From the Edit menu, choose Manage
Groups.
-
Select the name of the group
that you want to delete.
-
Click Delete Group.
-
(Windows) Click OK. (Macintosh)
Click Done.
Viewing information about people
or conference rooms
You can
view contact information about a person, or view information about a conference
room, such as its location, capacity, and phone extension.
-
From the Edit menu, choose Search
Directory.
-
Click People, and type the person's
name.
-
Click Search.
-
Select the person's name.
-
Click Information to view information
about the person, such as their phone number or mailing address. The
person's information was entered by the system administrator and can only
be edited by the system administrator.
-
Click OK when you are done viewing
the information.
-
To view information about a
conference room, click Resources.
-
Click Search.
-
Select the conference room.
-
Click Information to view information
about the conference room, such as its location, phone number, or capacity. The
resource's information was entered by the system administrator and can
only be edited by the system administrator.
-
Click OK when you are done viewing
the information.
-
Click Done to close the dialog
box.
Note To
view your user information, you can choose User Information from the Edit
menu. This information was entered by the system administrator and can
only be edited by the system administrator.
Displaying your In-Tray
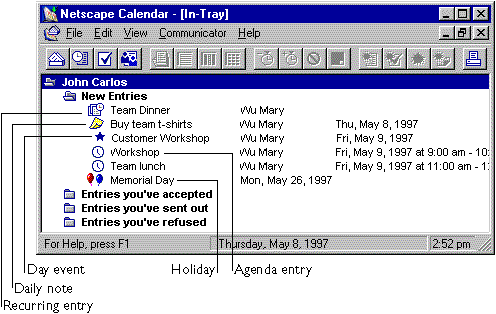
Your In-Tray
is the central place where you can view all meetings, notes, events, and
holidays proposed by other Calendar users. Your In-Tray also lists entries
that you have sent to other users, as well as entries you've accepted and
refused.
-
From the File menu, choose Open
In-tray.
-
(Windows) To see the list of
entries in a folder, click the folder. (Macintosh)
To see a list of entries in a folder, click the triangle to the left of
the folder.
-
To see more information about
an entry, double-click it.

Creating and managing tasks
A task
is a personal "to-do" item that you want to track but that you don't schedule
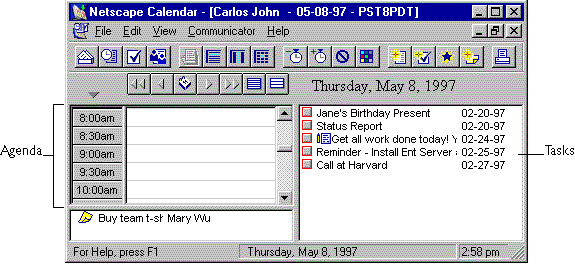
in your agenda like a meeting. Calendar lists tasks in your daily agenda
and in the task window.
Follow
these steps to create a task:
-
From the File menu, choose New,
and then choose Task.
-
Enter the requested information
in the dialog box.
-
(Windows only) If necessary,
click OK.
-
Click Create.
Viewing tasks in your daily agenda
-
Open your agenda. See
"Viewing your agenda" if you don't know how to open your agenda.
-
From the View menu, choose Day. Calendar
lists tasks on the right side of the agenda window.

Managing tasks
You can
view, edit, and add tasks in the task window. You use the task window to
track tasks and their priorities, due date, and percentage complete.
-
To open the task window, from
the File menu, choose Open Tasks, and then choose Your Tasks.
For more
information about working with tasks in the task window, see Calendar's
online help.
Printing your agenda
You can
print your agenda in popular layout formats such as Franklin, Day-Timer,
and Day-Runner, or you can create your own custom print format.
-
Open your agenda. See
"Viewing your agenda" if you don't know how to open your agenda.
-
From the File menu, choose Print.
-
Choose the print options you
want.
-
(Windows) Click OK. (Macintosh)
Click Print.
Creating a custom print format (Windows)
-
Open your agenda.
-
From the File menu, choose Print.
-
Click the Options button.
-
Choose the layout options you
want for your daily, weekly, or monthly agenda.
-
Click OK to close the Layout
Options dialog box.
-
Click Preview to preview the
printed pages of your agenda.
-
Click OK.
Creating a custom print format (Macintosh)
-
Open your agenda.
-
From the Edit menu, choose Preferences,
and then choose Print Layout.
-
Choose the layout options you
want for your daily, weekly, or monthly agenda.
-
Click OK.
-
Choose Print Preview from the
File menu to preview the printed pages of your agenda.
-
Click Print and choose the print
options you want.
-
Click Print.
Working offline
When you
sign into Calendar, you can choose to work offline (not connected to a
server) instead of online (connected to a server). Working offline is useful
when it's not convenient to connect to a server. For example, if you travel,
you can work offline with Calendar on a portable computer. When you return
to your office and reconnect to your server, Calendar automatically updates
any meetings you or others scheduled while you were working offline.
Note Calendar's
Go Offline and Go Online commands work independently from Navigator's Go
Offline and Go Online commands.
Setting your offline preferences
Before
using Calendar offline, you can set your offline preferences to specify
which agendas you want to download.
-
From the Edit menu, choose Preferences,
then choose Off-line.
-
Choose the preferences you want. When
you use Calendar offline, you can only work with the agendas that you specify
in your offline preferences.
-
Click OK.
Going offline and reconnecting later
If you're
already connected to the server, follow the steps below to disconnect so
you can work offline.
-
From the File menu, choose Go
Off-line.
-
When you want to later reconnect
to the server, choose Go On-line from the File menu.
Signing into work offline
Follow
these steps to sign into Calendar without connecting to the server:
-
From the Communicator menu,
choose Calendar.
-
Type your user name and password.
-
For server name, choose Off-line.
-
Click OK.
Setting your preferences
You can
set your preferences to customize Calendar for your use.
Setting scheduling preferences
To help
prevent schedule conflicts when others want to schedule a meeting with
you, you can tell Calendar about the times and days you are generally available
for meetings.
Follow
these steps to set scheduling preferences:
-
From the Edit menu, choose Preferences,
and then choose Scheduling.
-
(Windows) Click the tabs to
view your preferences for each day of the week. (Macintosh)
Choose a weekday from the list to see your preferences for that day.
-
For each day of the week, choose
your normal and extended work hours.
-
Click OK.
Setting agenda display preferences
Agenda
display preferences affect how Calendar displays your agenda.
Follow
these steps to set agenda display preferences:
-
From the Edit menu, choose Preferences,
and then choose Agenda.
-
Click Display.
-
Choose the options you want.
-
To hide declined entries, uncheck
Declined Agenda Entries. If you don't hide declined
entries, every invitation you receive will appear on your schedule, whether
you accept or decline it.
-
Click OK.
Setting agenda notification preferences
Agenda
notification preferences tell Calendar how to notify you and others about
new, deleted, or changed meeting notifications.
Follow
these steps to set notification preferences:
-
From the Edit menu, choose Preferences,
and then choose Agenda.
-
Click Notification.
-
Choose the options you want.
-
Click OK.
Changing time zone preferences
You may
need to change your time zone when you're working off-line and traveling
or when you want to schedule agenda entries with users in another time
zone.
Follow
these steps to set time zone preferences:
-
From the Edit menu, choose Preferences,
and then choose General.
-
Click Time Zones.
-
Choose the options you want.
-
Click OK.


