Chapter
6
Using Conference
This chapter
describes how to hold an online conversation using Netscape Conference.
Conference lets you talk "live" with a remote colleague, sketch on a collaborative
whiteboard that both of you can see, browse the Web together, and exchange
files.
Getting started (Windows)
Before
you can use Conference for the first time, Communicator asks you for some
information so it can set up your Conference preferences.
Note
If you want to use Conference to make and receive voice calls, your computer
must include a sound card, microphone, and speakers or headphones. However,
you don't need these features in order to use Conference to communicate
with a remote colleague.
-
From the Communicator menu,
choose Conference.
-
If this is the first time you
are starting Conference, follow the instructions in the Conference Setup
Wizard. If you don't know what information to
enter, ask your system administrator or Internet Service Provider.
Note If
you need to change your Conference preferences later, choose Preferences
from the Call menu in Conference. (If you later add a new sound card or
make other changes to your computer, rerun the Setup Wizard by choosing
Setup Wizard from the Help menu.)
Getting started (Macintosh and Unix)
Before
you can use Conference for the first time, Communicator asks you for some
information so it can set up your Conference preferences.
Note If
you want to use Conference to make and receive voice calls, your computer
must include a microphone and speakers or headphones. However, you don't
need these features in order to use Conference to communicate with your
colleague remotely.
-
From the Communicator menu,
choose Conference.
-
If this is the first time you
are starting Conference, enter the requested information. Click
Help in the Preferences dialog box for more information. If you don't know
what information to enter, ask your system administrator or Internet Service
Provider.
-
Click OK.
-
Start Conference again.
Note If
you need to change your Conference preferences later, choose Preferences
from the Call menu in Conference.
Starting a conference
Before
you can begin using Conference's collaborative tools, you must place a
call to your remote colleague, even if you don't plan to actually speak
with that person. If your computer (or your remote colleague's computer)
doesn't include a sound card, a microphone, and speakers or headphones,
you can use the Chat tool to communicate in real time by typing text, and
you can also use Conference's other tools.
Note In
order to receive Conference calls, your remote colleague must have the
Netscape Conference window open or hidden as a desktop icon. See
"Receiving a call" for more information.
Finding someone for a conference
To call
your remote colleague, all you need is that person's email address. If
you don't know or don't remember the email address, you can look for it
in Communicator's address book or you can use Conference's Web Phonebook.
Calling from Communicator's address book
-
From the Communicator menu,
choose Conference.
-
Click Address Book in the Netscape
Conference window.
-
Select the person you want to
call. Make sure the person's name and email
address appears. Conference can't make the call without them.
-
Click the Call button.
Calling from the Web Phonebook
-
From the Communicator menu,
choose Conference.
-
Click Web Phonebook in the Netscape
Conference window. Conference displays the Web
Phonebook located at the web address listed in the Network Preferences
dialog box. (Choose Preferences from the Call menu (Windows and Unix) or
Edit menu (Macintosh) and click Network to see the current Phonebook URL.
This address is initially set to http:// www.four11.com/conference.
-
Locate the person you want to
call by listing the phonebook entries or by using the Search button.
-
Click the Conference link next
to the person's email address to place the call.
Making a call
If you
already know your remote colleague's email address, you can call them directly
from the Conference window.
-
From the Communicator menu,
choose Conference.
-
Type the email address of the
person you want to call.
-
Click Dial. Conference
notifies you if the person answers the call or is unavailable. Once the
recipient accepts the call, you can begin using Conference's Chat, Collaborative
Browsing, Whiteboard, and File Exchange tools.
-
If you or the person you're
calling doesn't have an audio-equipped computer, use the Chat tool to start
communicating. See
"Chatting with text" for more information. You can also use Conference's
Collaborative Browsing, Whiteboard, and File Exchange tools even if you
or your remote colleague doesn't have an audio-equipped computer.
-
Begin talking within range of
your microphone.
Tip Once
you begin talking, it's a good idea to use the Chat tool to ask the other
person if they can hear you.
-
To make sure you're receiving
sound, adjust the speaker volume if necessary, and check that the speaker
button is on.
-
Adjust the silence sensor if
necessary. When talking, the bars of the microphone
meter should extend to the right of the silence sensor. When not talking,
the bars should remain to the left of the silence sensor. See Conference's
online help, or choose Troubleshooting Audio from the Help menu for more
information.
-
To end the call, click Hang
Up in the Netscape Conference window.
Leaving a voicemail message
Note This
feature is only available for Windows 95 and Unix versions.
If the
person you are calling is not available, Conference asks you if you want
to leave a voicemail message. Conference sends the voicemail message as
an attachment to an email message.
You
can also send a voice mail message at any time by choosing Voice Mail from
Conference's Communicator menu.
Receiving a call
Conference
must be running in order to receive calls.
To
receive a call:
-
From the Communicator menu,
choose Conference.
-
When Conference displays a dialog
box informing you of an incoming call, click Accept Call (Windows) or Answer
(Macintosh).
Tip (Windows)
To hide the Conference window and still listen for incoming calls, choose
Hide Window from the Call menu. A conference attendant icon appears in
your task bar tray. Double-click it to display the Conference window.
(Macintosh) To hide
the Conference window and still listen for incoming calls, choose Hide
Netscape Conference from the Finder's Application menu.
(Unix) To hide the
Conference window and still listen for incoming calls, minimize the Conference
window.
Setting call options
-
From the Call menu, choose one
of the following options:
-
Always Prompt: You have the
choice to accept or refuse each call individually. (This is the initial
setting.)
-
Auto Answer: Conference accepts
all incoming calls automatically.
-
Do Not Disturb: Conference refuses
all calls. However, you can still place calls while Do Not Disturb is in
effect.
Your choice
affects all future incoming calls.
Important If
you have chosen Auto Answer and you're using the Whiteboard while not participating
in a Conference session, it's a good idea to save your Whiteboard edits
often. Otherwise, an incoming call might cause you to lose your unsaved
Whiteboard edits.
Hearing a call
You can
adjust the microphone sensitivity, speaker volume, and silence sensor to
improve sound quality.
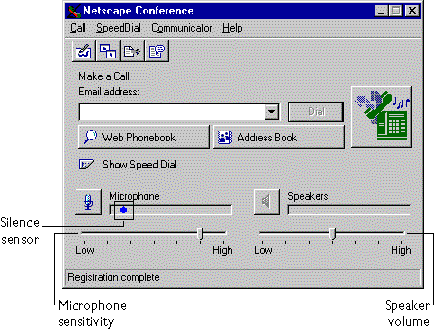
For
more information, choose Troubleshooting Audio from the Help menu in the
Conference window, or see Conference's online help for information on adjusting
audio levels and setting options in the Audio Preferences dialog box.
Ending a call
Ending
a call also ends your interactive session with Conference's collaborative
tools.
-
Click Hang Up in the Netscape
Conference window.
Chatting with text
The Chat
tool provides an alternative way for you to communicate in real time with
a remote colleague if either of you does not have an audio-equipped computer.
Once
you've established a call with your remote colleague, you can use the Chat
tool to exchange messages. You can also display the contents of a text
file and save a transcript of your chat session that you can print to create
meeting minutes.
Follow
these steps to start chatting:
-
Establish a call with your remote
colleague. See
"Making a call" or "Receiving a
call" for more information.
-
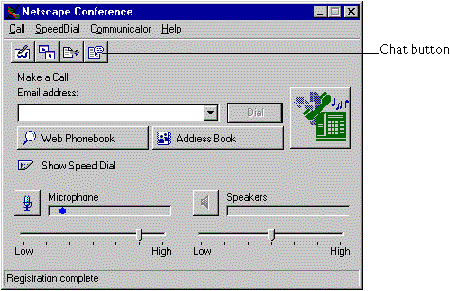
Click the Chat button in the
Netscape Conference window.
-
Begin typing (or paste some
text from the clipboard).
-
Click the Send button to transmit
the message to your remote colleague. (Windows
and Unix) Alternatively, press Ctrl-Enter to transmit your message.
(Macintosh)
Alternatively, press Return to transmit your message.
Including a text file
-
Begin typing in the Conference
Text Chat window.
-
(Windows and Unix) From the
File menu, choose Include. (Macintosh) In the
Text Chat window, click the Folder button.
-
Locate the text file, and click
Open.
-
Click the Send button to transmit
the message to your remote colleague.
Saving a transcript
-
(Windows and Unix) In the Text
Chat window, choose Save As from the File menu. (Macintosh)
In the Text Chat window, click the Save button.
Browsing together
During
a Conference session, you can browse the Web using Netscape Navigator and
have your remote colleague instantly see the same site in their Navigator
browser. When used together with the Chat tool or a voice conversation,
collaborative browsing becomes a powerful way to communicate and share
ideas.
-
Establish a call with your remote
colleague. See
"Making a call" or "Receiving a
call" for more information.
-
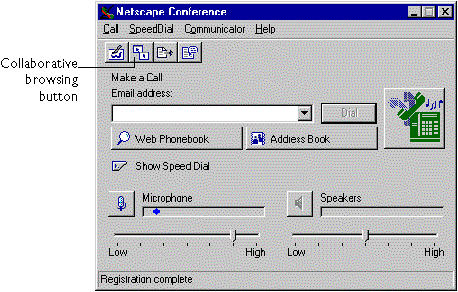
In the Conference window, click
the Collaborative Browsing button.
-
Click Start Browsing. If
Navigator is not running, it automatically starts when you click Start
Browsing.
-
Switch to your Navigator browser
and begin browsing. As you move from one web
page to another, your remote colleague's browser updates to the same page.
However, scrolling within a page or resizing your browser window does not
cause your remote colleague's browser to update. You might want to use
the Chat tool or a voice conversation to tell your colleague to scroll
down on the page or resize their browser window to see a particular part
of the page.
-
You or your remote colleague
can take control of browsing at any time by checking Control the Browsers.
-
To end the browsing session
(but not the Conference call), click Stop Browsing, then click Close. If
you want to close the Collaborative browsing window while you continue
to browse with your colleague, just click Close instead.
Note Collaborative
browsing provides limited support for web pages that contain frames. The
person in control of the browsing session sees all the frames the page
contains, but the person who's not controlling the session only sees the
page's active frame.
Editing an image together
Using
Conference's shared Whiteboard, you and your remote colleague can look
at, mark up, or make changes to the same image using a set of drawing,
zoom, and markup tools. You can then print your marked-up images or save
them for future use. The images you work on can be ones that you've created
or captured on your computer, copied from a web site, received as a fax
or as an attachment in an email message, or scanned in from a printed page.
You can also create new images directly on the Whiteboard.
Using an image stored on your computer
-
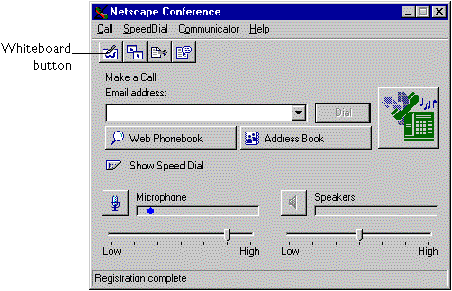
In the Netscape Conference window,
click the Whiteboard button.
-
From the File menu, choose Open.
-
Choose the file type you want
to open.
-
Select the file you want and
click Open.
-
Click a location in the Whiteboard
to place the image.
You can
also copy the image from another program into the clipboard, and then choose
one of the Paste commands from the Whiteboard's Edit menu. For more information
about the Paste commands, see Conference's online help.
Capturing an image
-
From the Capture menu, choose
one of the following:
-
Capture Region: captures a portion
of your screen
-
Capture Window: captures the
contents of a window
-
Capture Desktop: captures your
entire screen
-
To capture a region, drag the
cursor to select a portion of your screen. To
capture a window's contents, click in the window. To capture the entire
window, including the frame and title bar, click the window's title bar.
-
Click a location in the Whiteboard
to place the image there.
Working with the Whiteboard
The Whiteboard
contains tools that let you create and edit images and add text or freehand
line annotations to them. Before you can use the Whiteboard drawing tools,
it's important to understand how they work with the two different layers
in the Whiteboard window.
The
Whiteboard has two distinct layers, the markup layer and the image layer:
-
The markup layer contains the
drawings you make using tools from the toolbox, including circles, squares,
lines, and text, as well as items pasted from the clipboard.
-
The image layer contains images
you've opened from your hard disk, or images you've captured using commands
in the Capture menu.
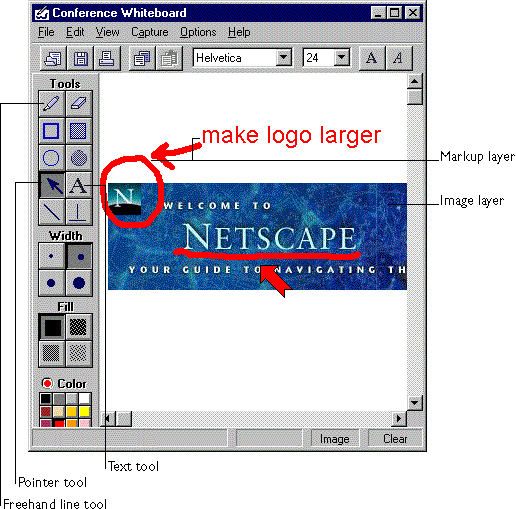
For information
about how to use the drawing tools and how to change Whiteboard tool settings,
see Conference's online help.
Using the pointer
You can
use the Pointer tool to draw attention to a specific part of an image for
your remote colleague.
-
Click the Pointer tool.
-
To place the pointer, click
the spot on the Whiteboard that you want to draw attention to.
-
Click another spot to move the
pointer to that spot.
Clearing and erasing the Whiteboard
Follow
these steps to erase markups:
-
From the Options menu, choose
Erase markups.
-
Click the Eraser tool.
-
Drag the eraser across a markup.
Follow
these steps to erase markups and images:
-
From the Options menu, choose
Erase Images.
-
Click the Eraser tool.
-
Drag the eraser across an image
or markup.
Follow
these steps to clear all markups in the markup and image layers:
-
From the Edit menu, choose Clear
Markups.
Follow
these steps to erase the entire Whiteboard:
-
From the Edit menu, choose Clear
White Board.
Zooming in and out
Follow
these steps to magnify or reduce an area of the Whiteboard:
-
From the View menu, choose a
zoom-in level.
-
Click the spot in the Whiteboard
that you want to zoom in on.
-
From the View menu, choose a
zoom-out level to reduce the size of the Whiteboard.
-
From the View menu, choose Original
size to restore the original Whiteboard size.
Exchanging files
You can
exchange files of any format with your remote colleague, so that you both
have immediate access to important documents.
Follow
these steps to send a file:
-
Establish a call with your remote
colleague. See
"Making a call" or "Receiving a call"
for more information.
-
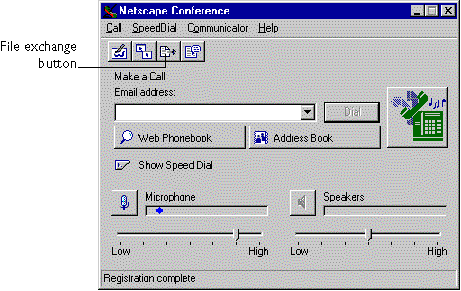
In the Netscape Conference window,
click the File Exchange button.
-
(Windows and Unix) From the
File menu, choose "Add to send list." (Macintosh)
Click the Add button.
-
Locate the file you want to
send.
-
Click Open.
-
Repeat steps 2 through 4 to
choose additional files.
-
Click the Send button in the
File Exchange window.
Windows and Macintosh
users You can drag a file from a folder
on your desktop and drop it into the "Files to send" window.
For information
about setting file exchange options, see Conference's online help.
Setting up your business card
Your Conference
business card identifies you to your remote colleague. As soon as you establish
a call, your remote colleague's business card appears in the Call window
(Windows and Unix) or in a separate window (Macintosh).
You
may have already entered some of your business card information through
the Setup Wizard. You can enter additional information or change the existing
information in the business card if you want.
Note Although
you don't need to enter all the information in the business card, you must
enter your name and email address in order to use Conference.
To set
up your business card:
-
(Windows and Unix) From the
Call menu, choose Preferences. (Macintosh) From
the Edit menu, choose Preferences.
-
Click the Business Card tab
in the Preferences dialog box.
-
Choose a photo and enter the
information you want. For more information about
setting business card preferences, click the Help button.
-
Click OK.
-
Restart Conference to have your
changes take effect.
Seeing your remote colleague's business card
information (Windows and Unix)
-
Click your remote colleague's
photo.
Seeing your remote colleague's business card
information (Macintosh)
-
Click the remote colleague's
window to activate it.
-
From the Tools menu, choose
the About command for your remote colleague's name.


