Chapter
5
Using Composer
This chapter
provides basic information about using Composer to create, edit, and publish
your own web pages.
What's the difference between browsing and
editing web pages?
You use
the Navigator browser to find and view web pages on the World Wide
Web. When you are browsing, you don't need to know about the components
that make up a web page.
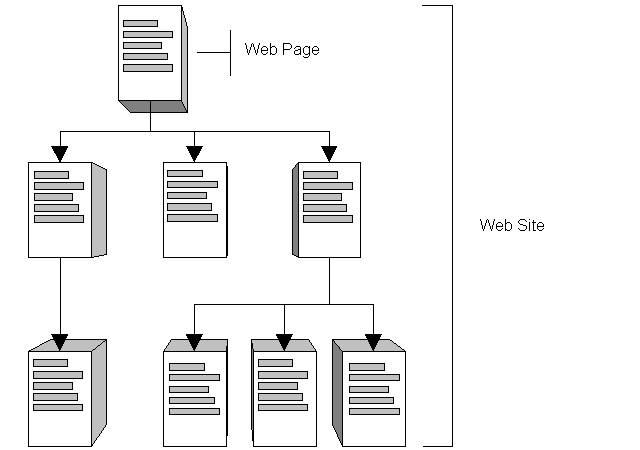
When
you browse the Web, the pages you see are typically organized into separate
collections of pages called web sites. Each web site consists of
several pages linked together in an organized way to create a consistent
presentation of the information available at that web site.
To
create or edit your own web pages and place them on the Web, you use Netscape
Composer. You use Composer just as easily as you would use a word processing
program. The files that Composer creates are called HTML (HyperText Markup
Language) files because they contain HTML formatting codes. Navigator knows
how to interpret these HTML codes to display Composer files as formatted
web pages containing images and links.
Creating and publishing a web page
Here are
the basic steps you'll follow to create and publish a web page. You'll
find details on each step throughout the rest of this chapter.
-
Start Netscape Communicator.
-
Choose Page Composer from the
Communicator menu.
-
Create a web page using basic
editing tasks, such as entering text, and formatting characters and paragraphs.
-
Put the finishing touches on
your web page by adding a table or inserting an image.
-
Create links to other places
in your page, and to other web pages.
-
Publish your web page so that
others can view it.
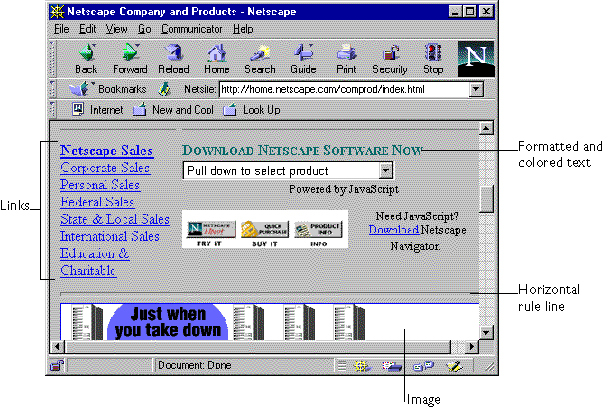
What can a web page contain?
A web
page can include some or all of the following elements:
-
formatted and colored text
-
still or moving images such
as photographs or animations
-
links that take you to another
location in the same page or to another web page
-
formatted tables
-
horizontal rule lines
Starting Netscape Composer
There
are several ways to open the Composer window, depending on which of the
following you want to do:
-
Create a new page
-
Edit the page you're currently
browsing
-
Edit an existing HTML file stored
on your computer
Creating a new web page
To create
a new web page, you can choose one of the following starting points:
-
start with a blank web page
-
use a web page template, a sample
page that contains common elements found on most web pages
-
use the Web Page Wizard, a special
page on the Netscape home site that walks you through the steps for creating
a web page.
Starting with a blank page
-
From the File menu choose New,
and then choose Blank Page, or choose Page Composer from the Communicator
menu.
-
Enter text. See
"Basic editing" for more information.
Creating a page using a template
Note
The Netscape templates are located on the Netscape home site. You must
be connected to the Internet to access them.
-
From the File menu choose New,
and then choose Page From Template.
-
To use a remote page as your
template, enter the page's URL. To use a file stored on your hard disk,
click Choose File. To choose from a list of custom-designed templates,
click Netscape Templates. After clicking Netscape
Templates, choose a template (to see a list of templates, you might have
to scroll down).
-
To work with a Netscape template,
choose Edit Page from the File menu to use the template as the basis for
a new web page.
-
Edit the text. See
"Basic editing" for more information.
-
From the File menu, choose Save.
Creating a page using the Page Wizard
The Page
Wizard is a special page on the Netscape home site that walks you through
the steps of creating a web page. When you've completed the following steps,
you'll have a page that you can open in Composer for entering and editing
text.
Note
The Page Wizard is located on the Netscape home site. To access it, you
must be connected to the Internet.
-
From the File menu choose New,
and then choose Page From Wizard.
-
Follow the instructions provided
to create a page.
-
From the File menu, choose Edit
Page.
-
Continue entering and editing
text. See "Basic editing" for more information.
-
From the File menu, choose Save.
Editing the page you are browsing
To edit
the page you are browsing, you have to be able to access the page's HTML
file (called the source file). If you don't have the proper access (called
write access) to the server where the source file is stored, then you can
only browse the web pages on that server.
Most
often you'll edit pages that are stored on your own computer. However,
you might be able to directly edit your own web pages stored on your Internet
Service Provider's server.
-
Display the page you want to
edit in Netscape Navigator.
-
From the File menu, choose Edit
Page.
-
Enter or edit text. See
"Basic editing" for more information.
-
From the File menu, choose Save.
Editing an HTML file stored on your computer
-
(Windows and Unix) From the
File menu choose Open Page. (Macintosh) From
the File menu, choose Open, then choose Page in Composer.
-
Click Choose File.
-
Select the file you want to
edit.
-
(Windows and Macintosh) Click
Open. (Unix) Click OK.
-
(Windows and Unix only) Click
Open again.
-
Enter text. See
"Basic editing" for more information.
-
From the File menu, choose Save.
Basic editing
You enter
and edit text in the Composer window just as you would in a word-processing
program.
Tip For
information about designing web pages, see Composer's online help.
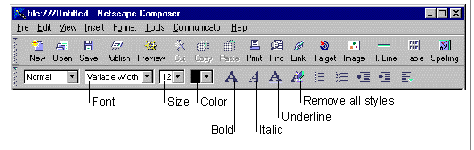
Using the toolbars
The toolbars
contain buttons corresponding to frequently used commands. Use the Composition
toolbar to work with files. Use the Formatting toolbar to apply text styles.
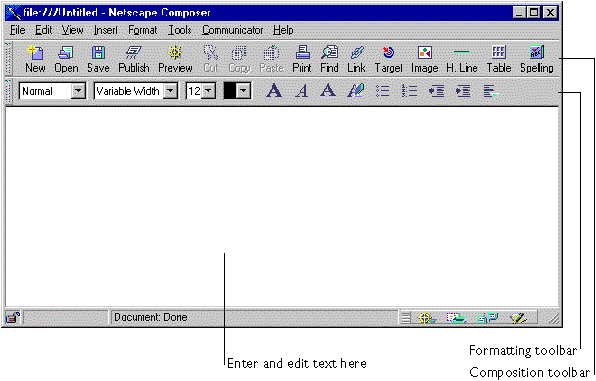
Entering and editing text
-
Position the cursor over the
Composer window.
-
Click to mark an insertion point.
-
Begin typing your text.
Typing special symbols
To insert
special symbols, such as the copyright (©) symbol, run the Windows
Character Map application or the Macintosh Key Caps program.
-
Open your character mapping
program.
-
Change the font to Times Roman.
-
Select the symbol you want.
-
Copy the symbol.
-
From the Edit menu choose Paste
in the Composer window.
Selecting text
-
Double-click a word to select
it.
-
Click the beginning of a line
to select the entire line.
-
Double-click the beginning of
a paragraph to select the entire paragraph.
Displaying paragraph marks
-
From the View menu, choose Show
Paragraph Marks to see where paragraph marks are located in your document.
Composer
also displays a short horizontal line to indicate the end of the document.
Copying and pasting text
You can
paste text into your document from almost any source. For example, you
can select text on a page you are viewing in Netscape Navigator and copy
it using Navigator's Copy command from the Edit menu. You can then switch
to the Composer window and paste the text into the Composer window by choosing
Paste from the Edit menu.
Note
Text that you copy from a web page that you're viewing in Netscape Navigator
does not retain formatting information when you paste it into the Composer
window. However, text that you copy and paste within the Composer window,
or from one Composer document to another, does retain its formatting.
Canceling or repeating your last action or
command
-
From the Edit menu choose Undo
to cancel your last action or command.
-
From the Edit menu choose Redo
to perform the most recent action or command again.
Note
Not all actions or commands can be undone.
Formatting text
Formatting
text consists of applying fonts, sizes, styles (bold, italic, and so on),
colors, alignment, and other options to text. Composer provides two types
of formatting:
-
Paragraph formatting, which
controls the appearance of entire paragraphs of text, including headings
and lists.
-
Character formatting, which
controls the font, size, style, and color of selected characters or words.
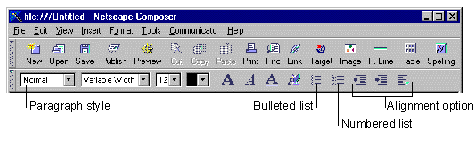
Formatting paragraphs
-
Click the paragraph you want
to format, or drag to select more than one paragraph. Composer
will apply the chosen paragraph style to the paragraph that contains the
insertion point or to all paragraphs in the selection.
-
From the Formatting toolbar,
choose a paragraph style, list style, or alignment option.
For more
information about the paragraph styles that Composer provides, see "Paragraph
Formats" in Composer's online help.
Formatting characters
-
Select the word or characters
that you want to format.
-
Choose a font, size, color,
or style from the Formatting toolbar.
Tip Additional
text styles (superscript, subscript, blink, and others) are available by
choosing Style from the Format menu.
For more
information about working with fonts and adding color, see Composer's online
help.
Searching for text (Windows)
-
From the Edit menu, choose Find
in Page.
-
Enter the characters you want
to search for.
-
Choose the search options.
-
Click Find Next to begin the
search.
-
Click Find Next again to continue
the search.
-
Click the Find dialog box's
close box when you are done searching.
-
From the Edit menu, choose Find
Again to find the next occurrence.
Searching for text (Macintosh and Unix)
-
From the Edit menu, choose Find
in Page.
-
Type the word or phrase you're
looking for.
-
Choose the search options you
want.
-
(Macintosh) Click Find to find
the next occurrence. (Unix) Click Find to start
or continue searching.
-
(Unix only) Click the close
box when you are done searching.
-
From the Edit menu, choose Find
Again to find the next occurrence.
Spell-checking your document
-
From the Tools menu, choose
Check Spelling, or click the Spelling button in the Composer window. Composer
checks for spelling errors using its main dictionary, which contains the
most common words. If Composer finds a word that is not in the main dictionary,
it displays the word in the Spelling dialog box and gives you choices for
correcting the possible misspelling.
-
For each word that Composer
displays in the Spelling dialog box, choose whether to correct it, ignore
it, or add it to the dictionary.
-
Click Stop to stop checking
spelling before Composer has finished checking the entire document.
-
Click Done to close the dialog
box.
Inserting a horizontal line
You can
insert one or more horizontal lines in your web page to help create visual
breaks between page sections. This is especially useful if your page is
a long one.
-
Click the location in the Composer
window where you want to insert the line.
-
Click the H. Line button in
the Composition toolbar, or from the Insert menu, choose Horizontal Line.
-
(Windows only) To increase the
line's height, position the cursor over the line so that the cursor changes
to a double-headed arrow, and drag the line upward.
-
To change line properties such
as line height, alignment, or 3D shading, double-click the line to display
the Horizontal Line Properties dialog box.
Deleting a horizontal line
-
Click the line to select it.
-
Press Delete.
Creating a table
Tables
let you present information such as financial data or a calendar of events
in a grid of columns and rows. You can also use one or more tables on a
page whenever you want to have greater control over the layout of your
text and images. For example, you could create a table that's the size
of the entire page, and then add text and insert images into the table's
columns and rows.
-
Place the insertion point where
you want the table to appear in your document.
-
From the Insert menu, choose
Table, and then choose Table..., or click the Table button on the Composition
toolbar.
-
Choose the settings you want.
-
Click OK to confirm your settings. If
you click Apply, you can preview the settings and make further changes
to them before clicking OK.
Selecting and deleting tables
Follow
these steps to select a table:
-
Place the insertion point inside
the table.
-
From the Edit menu, choose Select
Table. You can cut or copy the table and paste
it somewhere else in your document.
Follow
these steps to delete a table:
-
Place the insertion point inside
the table.
-
From the Edit menu, choose Delete
Table, then Table.
Adding and deleting rows, columns, and cells
Follow
these steps to add a row, column, or cell:
-
Place the insertion point in
the table where you want the new item to appear.
-
From the Insert menu, choose
Table, then choose Row, Column, or Cell.
Follow
these steps to delete a row, column, or cell:
-
Place the insertion point inside
the row, column, or cell you want to delete.
-
From the Edit menu, choose Delete
Table, then choose Row, Column, or Cell.
Setting table properties
After
you've created a table, you can change the table, row, or cell properties
at any time.
-
Place the insertion point inside
the table.
-
(Windows) From the Format menu,
choose Table Properties. (Macintosh) From the
Format menu, choose Table Attributes.
(Unix)
From the Format menu, choose Object Properties.
-
Choose the settings you want.
-
Click OK when you are done.
Note
The settings you choose override the settings used when you first created
the table.
Working with images
Composer
allows you to work with the two kinds of images that most current web browsers
support:
-
GIF (CompuServe Graphics Interchange
Format .GIF extension)
-
JPEG (Joint Photographic Experts
Group .JPG extension)
art lack
the higher quality of JPEG files, but they're more compact and display
more quickly in web browsers.
You
can get images by creating them yourself, scanning them, or buying them
as part of a commercial clip art package. You can also find GIF images
in the Internet's many image archives. See
"Saving an image" in Chapter 2, "Using
Navigator," for information on saving web page images on your hard
disk.
Note
If you intend to use images in your own web pages, make sure you get permission
from the owner of the image, or use royalty-free clip art so you don't
infringe on a possible copyright.
Inserting an image in your document
Follow
these steps to insert an image file located on your hard disk into the
document you're editing:
-
Click where you want the image
to appear in your document.
-
From the Insert menu, choose
Image, or click the Image button in the Composition toolbar.
-
(Windows and Macintosh) Click
Choose File to locate the image file on your hard disk. (Unix)
Click Browse to locate the image file on your hard disk.
An
image is actually a separate file that does not "live" in your Composer
document; the image file can be located on your hard disk or on a remote
computer.
-
(Windows and Macintosh) Select
the file and click Open. (Unix) Click OK.
-
Choose the options you want.
-
(Windows and Unix) Click OK. (Macintosh)
Click Insert.
By default,
Composer saves a copy of the image in the page's location on your hard
disk, so that the image always appears with your document.
Important If
you move the image file from its current location on your hard disk, it
will no longer appear in your document.
Tip You
can drag an image from a folder on your desktop or from your Navigator
browser window and drop it into your document. Composer places the image
at the insertion point location. To change the image's properties, double-click
the image.
(Windows) If you
paste or drag a BMP (Windows bitmap) image into your document, Composer
converts it to JPEG format. You can convert to other formats, such as the
popular GIF format, by using the appropriate plug-in.
Resizing an image (Windows only)
-
Position the pointer over the
image's highlighted border so that the pointer changes to a double-arrow
shape.
-
Drag the border to resize the
image.
Moving an image to a new location (Windows
only)
-
Drag the image and drop it at
the new location.
Creating a link
A link
(also known as a hyperlink) is an active part of a document. Clicking a
link can take you to:
-
another part of the same web
page
-
other web pages on your hard
disk or on a remote computer
Every
link contains the web address for the page that the link refers to. This
web address is called the page's URL (Uniform Resource Locator). See
"What's a URL?" in Chapter 2, "Using Navigator,"
or refer to Composer's online help for more information about URLs.
Follow
these steps to create links from text or images in your page to other web
pages:
-
In the Composer window, select
the text or image that you want to create a link for.
-
From the Insert menu, choose
Link, or click the Link button in the Composition toolbar.
-
(Windows and Macintosh) To link
to a file on your hard disk, click Choose File. (Unix)
To link to a file on your hard disk, click Browse File.
To
link to a file on a remote computer, type the file's URL.
-
Click OK.
Tip (Windows
and Unix only) To create a link to the page displayed in Netscape Navigator,
go to Navigator and drag the page proxy icon located to the left of the
Location (sometimes called "Netsite") field into the Composer window. You
can also drag a file from your desktop or drag a link from Messenger or
Collabra Discussions into the Composer window to add it to your document.
Note
If you type new characters at the end of a link's text, Composer adds the
new characters to the link's text. If this is not what you want, click
the Remove all character styles button  in
the Formatting toolbar before typing the new text.
in
the Formatting toolbar before typing the new text.
Browsing a page you've created
It's a
good idea to browse the pages you create so that you can test the links
you've created.
-
From the File menu, choose Browse
Page to display the current page in the Navigator browser.
-
Save the page if you haven't
already done so.
-
If you're connected to the Internet,
click the links you created to make sure they go to the locations you want.
About publishing your page
Once you
have finished creating your web page and have tested the links, you can
publish your page on a web server computer. If your page exists only on
your local hard disk, you can browse your page, but no one else can. When
you publish your page on a server, you copy your page to a computer that
lets others see your page.
What's a web server?
A web
server is a computer that runs all the time and waits for web client programs
like Netscape Navigator to connect to it and request a copy of a specific
web page. When the web server receives a request for a page, it sends a
copy of the page to the Navigator browser that made the request.
Finding a web server
Ideally,
you can publish your web pages on the server owned by the same organization
or Internet Service Provider that gives you access to the Internet. Ask
your system administrator or Internet Service Provider about publishing
your web pages on their server.
Tip See
the Netscape Web Page Starter site for a list of service providers that
offer web publishing accounts. From the Help menu, choose Product Information
and Support. Scroll down if necessary and click the Web Page Starter link.
Naming your files
Filenames
use different conventions and restrictions depending on the operating system
(Windows, Macintosh, or Unix). Since a server computer may run a different
operating system than yours, you'll want to name your files so that they
can be used on the server computer. For example, if you're copying your
files from a Macintosh computer to a Windows 3.1 computer, you'll need
to name your files using filenames that are no longer than eight characters,
followed by a three-character extension, for example: report.htm or resume.htm.
Don't use spaces or other special symbols; use only lowercase letters and
numbers.
Publishing your page (Windows)
-
Open the file that you want
to publish.
-
From the File menu, choose Publish,
or click the Publish button in the Composition toolbar.
-
Type the page's title. The
title appears in the browser's title bar and in bookmarks created for this
page.
-
Type the page's file name as
you want it to appear on the server.
-
Type the URL for the location
of the remote site where you want to publish your page. If
you're not sure what to type, contact your system administrator or Internet
Service Provider.
-
Type the user name you use when
accessing the network where your web page will be located.
-
Type the password for your user
name.
-
Choose Files associated with
this page to include any image files your web page uses.
-
Click OK.
-
To see your page, choose Browse
Page from the File menu. You may need to click
Reload to see the page.
Publishing your page (Macintosh and Unix)
-
Open the file that you want
to publish.
-
From the File menu, choose Publish,
or click the Publish button in the Composition toolbar.
-
Type the URL for the location
of the remote site where you want to publish your page. If
you're not sure what to type, contact your system administrator or Internet
Service Provider.
-
Type the user name you use when
accessing the network where your web page will be located.
-
Type the password for your user
name.
-
Choose the files you want to
include.
-
Click Publish.
-
To see your page, choose Browse
Page from the File menu. You may need to click
Reload to see the page.
Setting publishing preferences
You can
specify the settings Composer uses for publishing your pages, so that you
don't have to enter them each time you want to publish a page.
-
From the Edit menu, choose Preferences.
-
(Windows) Click the + symbol
next to Composer. (Macintosh and Unix) Click
the triangle symbol next to Editor.
-
(Windows) Click Publishing. (Macintosh
and Unix) Click Publish.
-
Choose the settings you want
for links and images.
-
Type the default publishing
and browse locations.
-
Click OK.
Telling others how to find your page
Tell others
the URL for your weg page so that they can view it. If you send them an
email message that contains the URL, Messenger automatically converts the
URL into a link that they can click to go to your page.